DHT vs Traditional FUE: Simultaneous Extraction-Implantation Benefits
Published on Sun Mar 22 2026
Blog Summary
Direct hair transplant is a clinic workflow in which grafts are implanted very soon after extraction so that time outside the body is short. Traditional follicular unit extraction is a trusted approach in which grafts are harvested, kept hydrated and cool, and then implanted into carefully planned recipient sites. In this comprehensive guide I explain how both pathways work, how they are similar, and when one may fit your goals and scalp characteristics better. You will see the roles of design, donor stewardship, and gentle tissue handling, along with two clear step by step clinic day outlines, a practical technique comparison, and an easy recovery timeline from the first seventy two hours through the first year. I also share a simple candidacy guide and a safety checklist that keeps healing predictable. Kibo Clinic in Mumbai follows a calm, sterile, and methodical approach so that every step from consultation to visible growth feels understandable and supportive.
Introduction to DHT and Traditional FUE
Hair transplantation moves living follicular units from a stable donor region to areas of thinning. The artistry is in the design and the direction of each hair. The science is in the consistent handling of grafts, hydration, temperature control, and skin health. In contemporary practice there are two widely discussed pathways.
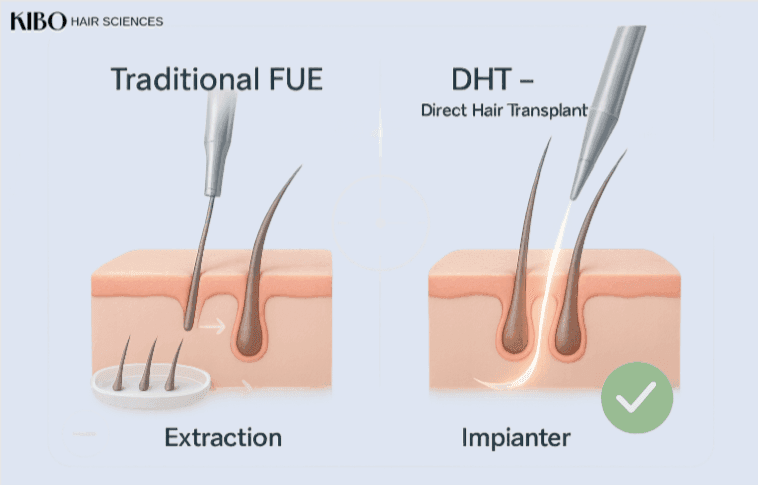
Traditional follicular unit extraction is the method many patients know by name. The team trims the donor area, applies local anaesthesia, and extracts follicular units using very small punches. Grafts are kept hydrated and cool in a protective medium. Recipient sites are created with precise angles and directions that copy natural patterns. Trained staff place each unit with magnification.
Direct hair transplant is a workflow variation. The team extracts a graft and places it promptly, often using implanter devices or a stick and place sequence. The intention is to reduce time that grafts spend outside the body. Both pathways are surgeon led, both depend on design, and both use sterile technique with careful graft handling. The right choice is based on your diagnosis, your hair calibre and curl, your donor reserves, and your personal priorities.
What Simultaneous Extraction and Implantation Really Means
Simultaneous or near simultaneous placement aims to keep grafts moist, cool, and protected by minimising the interval between extraction and implantation. Experienced teams already organise work so that time outside the body is limited, even when using a classic sequence. Immediate placement simply compresses the sequence further. The fundamentals do not change. A steady rhythm, continuous hydration, clean instruments, and magnification are still the pillars of predictable healing.
It helps to think of both pathways as sharing one core mission. The mission is to move living follicles without trauma, seat them at angles that look natural in everyday light, and protect the skin so that recovery feels calm. When you focus on these fundamentals, labels become less important than the plan that suits your hair and goals.
Traditional FUE in Plain Language
- Traditional follicular unit extraction is a two phase sequence. First comes harvesting and graft care. Second comes site creation and placement.
- During harvesting, the donor region on the back and sides is prepared and numbed. Follicular units are extracted one by one with tiny punches. Each unit is placed into a cool protective solution that keeps tissue hydrated. The team logs counts and prepares for implantation.
- During site creation and placement, the surgeon designs the hairline and draws directions that match natural flow. Micro blades or needles create channels that set angle and density. Trained staff place each unit with gentle handling and continuous hydration. This approach allows very precise planning, especially for larger fields or complex crown whirls.
Direct Hair Transplant in Plain Language
Direct hair transplant is not a new surgery. It is a way of organising time. The team extracts a unit and then places it promptly into a site that is created immediately before or during implantation. Some teams prefer implanter devices to carry and seat each unit. Others use a stick and place method in which a fine instrument creates a site and the graft is guided into position. The intent is to shorten the interval outside the body while keeping the same standards for design and sterility.
The choice between immediate placement and classic sequencing is practical. It reflects surgeon preference, team choreography, and your specific case. Either pathway can feel comfortable and predictable when handled with care.
Candidacy Considerations for Each Pathway
Choosing a pathway has more to do with your pattern and goals than with marketing terms. A dermatologist will examine scalp and donor zones, review medical history, and study photographs in consistent lighting. The following points usually guide the decision.
-
Hairline refinement with many single hairs often benefits from immediate feedback during placement. Direct placement can be very satisfying for this work when a team is experienced.
-
Temple restoration needs precise angles and very soft transitions. Both pathways can perform well when single hair units are used at the front and directions are honoured.
-
Crown restoration with a complex whirl can favour a classic sequence, since pre made sites across a larger field make it easier to maintain a natural spiral.
-
Mixed goals across several zones can suit a classic sequence since teams can harvest, pre plan sites, and then place in an orderly flow.
-
Travel and logistics sometimes favour a day that feels compact. Either pathway can be comfortable when breaks and reviews are built in.
These are planning preferences rather than rigid rules. The shared foundation is a design that fits your features and a donor strategy that preserves long term options.
Step by Step Clinic Day with Direct Placement
Knowing the day helps you relax and focus on healing. The following sequence is typical for a direct placement plan.
-
Arrival and photographs in standard positions with a final review of design on your own images
-
Local anaesthesia for the donor and recipient regions with calm vital sign monitoring
-
Extraction of a unit followed by prompt implantation into a freshly made site
-
Continuous hydration of grafts and skin while the team advances in a smooth rhythm
-
Short friendly breaks for hydration or a snack while instruments are refreshed
-
Demonstration of washing with delivery of written aftercare and scheduled reviews
This choreography reduces time outside the body while keeping every step gentle and clear.
Step by Step Clinic Day with Traditional FUE
A classic sequence suits many patterns and makes it easy to pause for review.
-
Arrival and photographs followed by a design map that shows zones and target densities
-
Local anaesthesia for comfort with calm monitoring throughout
-
Extraction of a batch of grafts with placement in a cool protective medium
-
Recipient site creation across planned areas with angles that match natural direction
-
Placement of units under magnification with continuous hydration and careful spacing
-
Demonstration of washing with delivery of written aftercare and scheduled reviews
The orderly handoffs between harvesting, site creation, and placement give teams a familiar rhythm and make large fields straightforward.
Technique Comparison for Planning and Expectation Setting
Direct Hair Transplant and Traditional FUE Compared
| Aspect | Direct hair transplant workflow | Traditional follicular unit extraction workflow |
| Core sequence | Extraction with prompt implantation to reduce time outside the body | Extraction followed by protected storage then planned site creation and implantation |
| Recipient site creation | Created immediately before or during placement, often with implanter devices or stick and place | Created in a planned field with micro blades or needles before placement |
| Graft handling focus | Immediate seating and continuous hydration during flow | Hydration and cooling in storage medium with organised placement |
| Direction control | Guided in real time during each placement step | Guided by pre made sites that fix angle and density across a field |
| Team choreography | Tight coordination so extraction and placement progress together | Orderly handoffs between harvesting, site making, and placement teams |
| Common use cases | Hairline and temples and compact mixed cases in experienced hands | Broad range of indications including large fields and complex crown whirls |
| Shared fundamentals | Surgeon led design, donor stewardship, sterile instruments, hydration, magnification, gentle handling, and clear aftercare | Surgeon led design, donor stewardship, sterile instruments, hydration, magnification, gentle handling, and clear aftercare |
Both methods depend on the same safety standards and the same attention to design. The best choice is the one that supports your goals and your hair characteristics.
Donor Stewardship and Design Principles that Matter Most
Your donor supply is a lifetime resource. A thorough plan begins with a measurement of density and calibre in safe harvest zones, an estimate of grafts available today and later, and a sensible distribution of density across zones. The frontal third and temples usually define the face and are often prioritised. The mid scalp and crown follow. The tools and timing support this plan rather than drive it. A believable hairline uses single hair units at the very front, micro irregularity that imitates nature, and directions that match your native growth. These principles hold whether grafts are placed immediately or after protected storage.
Recovery Timeline and Healing Stages for Both Pathways
Timeline for Healing after Direct Placement and Traditional FUE
| Time frame | What you will likely notice | Helpful tips |
| Day one to day three | Mild redness and a feeling of fullness in treated areas with light tenderness | Sleep with the head slightly elevated and follow the washing routine exactly |
| Day four to day seven | Light scabs lift and comfort improves each day | Avoid gyms, pools, and sauna and use only approved products |
| Week two | Skin tone approaches baseline and most scabs are gone | Wear breathable head coverings outdoors if needed |
| Week three to week four | Early growth cycle begins beneath the skin | Visible change is limited now so continue photographs and check ins |
| Month two to month three | Temporary shedding of short transplanted hairs with first sprouts beginning | Keep a simple photo log and stay consistent with aftercare |
| Month six to month twelve | Noticeable thickening and more styling freedom | Review goals and discuss refinements only if needed at routine follow ups |
This pattern is familiar to experienced teams and reflects public patient education from dermatology and public health bodies. The timeline is similar for both pathways.
Comfort, Clothing, and Daily Habits that Help
Most people feel ready for light routine within a few days. Use a breathable cap when cleared, usually after scabs have lifted. Choose shirts that button or zip in front in the first days so nothing brushes grafts. Keep hands clean and avoid touching recipient zones. Gentle walking is fine as soon as you feel steady. Cardio and resistance training return gradually after review. In Mumbai’s warm climate, hydration and shade during midday errands keep swelling and dryness under control in the first week.
Safety Essentials that Protect Healing
Hair transplantation is minor surgery and the safety basics are constant. Clean rooms, sterile instruments, hand hygiene, and skin preparation lower the chance of infection. Grafts are living tissue and are protected by hydration, temperature control, and minimal trauma. You will receive a small aftercare kit with a gentle cleanser and saline, written washing steps, and a simple activity plan. Clear instructions and scheduled reviews remove guesswork and keep the first week calm.
Normal Sensations and Warning Signs
What Feels Normal and What Needs Attention
| Feature | Typical early pattern | Concerning pattern that needs review |
| Redness | Present on day one and day two then fades | Spreads outward or persists beyond several days |
| Swelling | Peaks between day two and day three then improves | Worsens after day four or extends beyond treated zones |
| Itching | Common as scabs lift | Strong itch with a hot red patch that increases day by day |
| Discomfort | Mild tenderness that settles each day | Increasing pain or warmth to touch |
| Discharge | Thin clear or light yellow crust that dries | Thick yellow or green drainage or an unpleasant odour |
| Fever | Not expected | Fever, chills, or feeling unwell |
Early contact with your care team preserves comfort and protects outcomes. A quick message with photographs is usually all that is needed to receive tailored guidance.
Practical Questions Patients Ask
**Is direct hair transplant better than traditional follicular unit extraction ** Both can be excellent in trained hands. Direct placement emphasises very short time outside the body. Traditional follicular unit extraction emphasises protected storage and meticulous pre planned site creation. The right choice follows your diagnosis, your hair characteristics, and your goals.
Will recovery be faster with direct placement Early comfort reflects gentle handling, hydration, and a simple aftercare plan. Most patients return to light routine within a few days with either method.
Is one approach safer Safety depends on sterile technique, hand hygiene, and proper preparation. These fundamentals are the same for both pathways.
Can the two approaches be combined on the same day Yes. A hairline can be done with immediate placement of single hairs while a larger crown field uses pre made sites. This is a practical way to match method to zone.
Do I still need medical therapy after a transplant Transplantation covers specific zones. Ongoing thinning of non transplanted hair can continue based on your pattern. Your dermatologist may suggest evidence based therapy to protect the overall look.
Photography and Follow Up that Build Confidence
Use the same room, distance, and lighting for each photograph. Capture front, both profiles, crown, and a neutral top view. A simple schedule usually includes day one, week one, week two, month three, month six, and month twelve. Consistent photographs make progress honest and reassuring. Many patients in Mumbai prefer a week one in person check if schedules allow, followed by remote reviews that fit travel or work commitments.
Why People Choose Kibo Clinic in Mumbai
Kibo Clinic is a dermatologist led team that blends precise artistry with clean clinical practice. We map donor reserves, set target densities, and draw a design that suits your features. Recipient sites are created with fine instruments that guide angles and direction. We organise your day using either a direct placement sequence or a classic sequence so that the method fits your plan rather than the other way around. Aftercare is simple and proactive with clear instructions and predictable reviews. Patients in Mumbai and visitors from other cities value this friendly structure because it keeps every step transparent and focused on natural lasting results.
Services
Hair Regrowth Solutions
GFC Therapy | IV Hair Booster | Low-Level Laser Helmet Therapy | Mesotherapy for Hair Regrowth | Microneedling for Hair Regrowth | PDO Threads for Hair Regrowth | PRP Therapy
Hair Transplant Options
Follicular Unit Extraction (FUE) | Sapphire FUE | Body Hair Transplant | Corrective Hair Transplant | Hairline Correction | Unshaven Hair Transplant | Direct Hair Transplant (DHT) | Real Time FUE | Bio FUE
Related Blogs
Graft Survival Factors That Influence Outcomes | Single vs Multiple Follicle Grafts: Visual Differences | Hairline Design vs Graft Count Importance | Same Graft Count, Different Visual Results | Crown Restoration Challenges Explained | Mid-Scalp vs Hairline Density Expectations | Corrective Hair Transplants: When Needed | Beard-to-Scalp Hair Transplant Guide | Body vs Scalp Hair Restoration Outcomes | Long-Term Maintenance After Hair Transplant